A typical use of GemTcl is to connect to and control external
equipment. This tutorial is a step by step description of how to
create a GemTcl client that controls a simulated microscope. The
communications with the microscope in this example is by sending tcl
strings over XmlRpc, but any other communications protocol could
similarly be used.
So we have a super duper microscope that we want to connect to.
In the microscope documentation it states that its application
sits in the background and listens to commands through XmlRpc
at port 8124.
The following commands supported are listed:
ping
cmd
Evaluate a tcl command through its internal tcl interpreter.
There is also a list of the tcl commands it supports:
move_to
Move the camera of the microscope.
light
scale
get_image
The microscope simulator uses ghostscript to create its images, so you
must sure to have it installed on your system.
To run the microscope server, chdir to the server-examples directory
and enter the command:
Security warning!!! Note that the microscope-server is a glaping
security hole as it executes all tcl commands it receives over the net
at port 8124. Make sure to run this only on computers that have a
firewall that block this port and on which you can trust all local
users.
(In Windows just click on the microscope-server.exe application in the
bin directory. Note that the microscope simulator needs the
installation of ghostscript, that may be downladed from
http://pages.cs.wisc.edu/~ghost/ .)
To check the communications to the microscope, run gemtcl and enter the
following commands:
gemtcl_xmlrpc_client -host localhost -port 8124 -method ping
If everything is ok we should get "pong" back. Now lets try to speak
to the microscope tcl interpreter. But first lets generate a xmlrpc
object so we don't have to create a new http connection every time.
set xh [gemtcl_xmlrpc_client -connect -host localhost -port 8124]
gemtcl_xmlrpc_client -handle $xh -method cmd -params {expr 6*7}
If we got "42" back, then we know the answer.
Since the last command we used is likely to be used a lot, let's
create a file called mic.tcl and add the following to it:
proc mic_open args {
    global xh
    set xh [gemtcl_xmlrpc_client -connect -host localhost -port 8124]
}
proc mic args {
    global xh
    set cmd "gemtcl_xmlrpc_client -handle $xh -method cmd -params \"$args\""
    return [eval $cmd]
}
We can now try getting a picture from the microscope:
% source mic.tcl
% mic_open
% mic get_image -help
get_image - get an image from the microscope
Syntax:
    get_image [-filename fn]
% mic get_image -filename /tmp/mic.png
%
(In windows, change the filename to c:/temp/mic.png ).
You should have gotten the following image in /tmp/mic.png:
To move the camera use the move_to command and to change the light the
light command.
% mic move_to -rel -800 230
% mic light 5
% mic get_image -filename /tmp/mic.png
We are now ready to build a GUI for our microscope. Start by running
glade (see the next section for a description of how to launch glade from within GemTcl). In glade, enter the following interface:
You can use any glade layout commands, but take care of the Name field
of all buttons and other input widgets. These will be used by gemtcl to
retrieve and set the values of the widgets.
The screenshot shows the Up button that has got the name Up.
For the rest of this tutorial to work, you must create an image widget
with the name "image".
Save the interface as mic.glade .
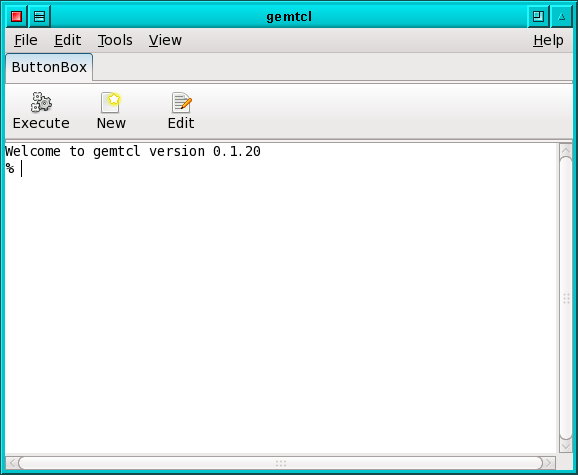
To build an interface with glade into GemTcl, press the File/New menu entry.
You're screen looks like this:
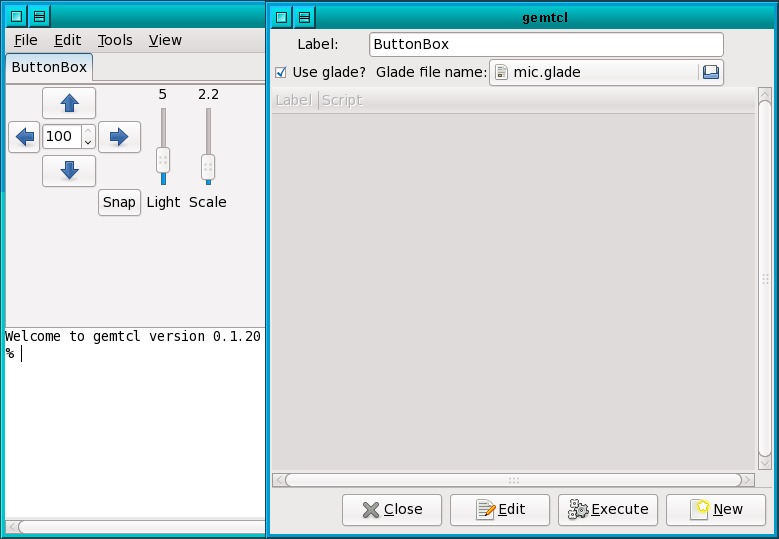
Press the "launch glade" button to run glade and follow the steps in the
previous section. When finished, press the Edit button, check the Use
glade? check button and choose your glade file. You may also want to
change the label to "Microscope". Your screen should look like this:
Press the close button to pop down the editor window.
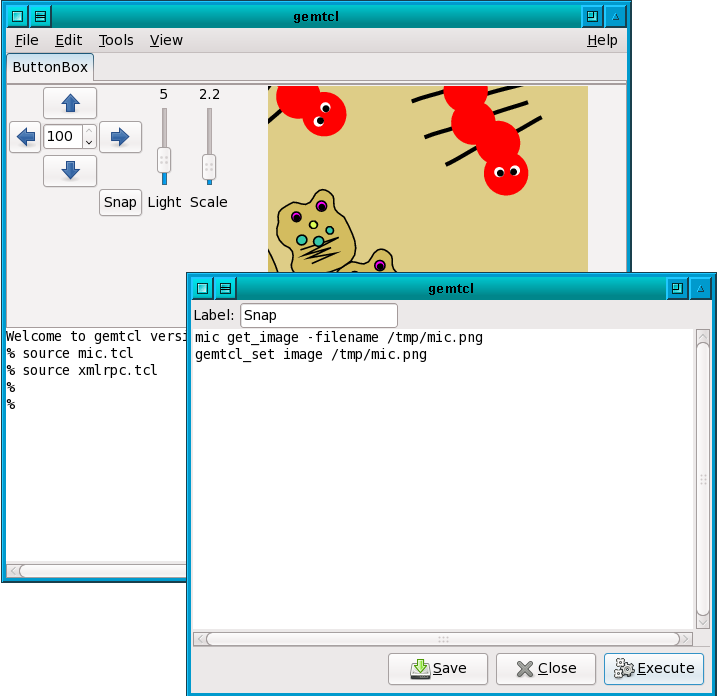
Now is the time to define the actions that will be executed when the
buttons are pressed. To edit the action of the Snap button right
click it and press Edit. Enter the following script and
press execute:
mic get_image -filename /tmp/mic.png
gemtcl_set image /tmp/mic.png
Your screen should look as follows:
Since taking images is something we want to do easily, it makes sense to
add the following proc to mic.tcl:
proc mic_image args {
  mic get_image -filename /tmp/mic.png
  gemtcl_set image /tmp/mic.png
}
Reread mic.tcl by "source mic.tcl".
Now change the action of Snap simply to "mic_image".
Press [Close] to close the editing window. You can now press the Snap button
to take snapshots from the microscope.
Define the action of the Up button:
mic move_to -rel 0 [gemtcl_get dist]
mic_image
Note how we extract the contents of the SpinButton "dist". In case
you forgot the name of the spin button you can right click on it
to get its name.
Similarly create the contents of the Right, Down, and Left buttons:
mic move_to -rel [gemtcl_get dist] 0
mic_image
mic move_to -rel [gemtcl_get dist] 0
mic_image
mic move_to -rel -[gemtcl_get dist] 0
mic_image
Play around with moving the microscope.
Now all that remains is to define the light and the scale buttons. Just
right click them and enter the following actions:
mic light [gemtcl_get light]
mic_image
mic scale [gemtcl_get scale]
mic_image
Save your work as mic.gtf .
Try exiting from gemtcl and reloading your interface by File/Load.
The loading may be done automatically by adding the following commands
to mic.tcl:
source xmlrpc.tcl
gemtcl_load microscope.gtf
gemtcl_set dist 10
mic_image
And invoking gemtcl as follows:
gemtcl -cmd "source mic.tcl"
To test it on windows do the following:
-
Run GemTcl
-
cd ../mic-example
-
source mic.tcl
